mardi 19 mars 2013

Green / Vert

Hi all,

This month I participate to a photographic exhibition. As usual, did not take the time to work in advance on the exhibition theme, that you'll guess to the title, is "The green color (except vegetation)".
I thus have, the day before the one we sort out and confirm photos participating in the exhibition in my club photo, taken some photos on an idea I had for some years and which had been inspired me during a previous photo contest.

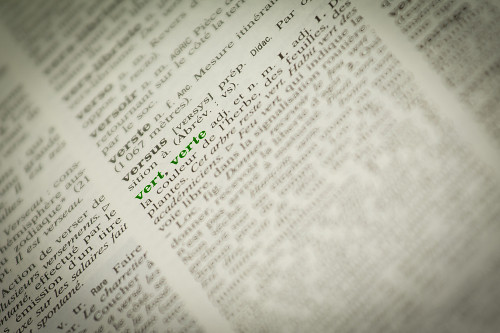
This one consisted to take shoot of a page from a dictionary but not a random one, the one where we could find Green definition. Then give it a additional effect in post-processing, changing the color of each letters of the word to green.
I first need to choose between all available dictionaries which one will render at best in photography. I look at a illustrated Larousse dictionary for 7 years old children, hoping that render will be pleasant but the display does not meet the idea I have for my photo. I retrieve thus a Hachette Dictionary and keep this choice.
I immediately installed un black background on which I put the dictionary opened on the right page, set my strobe oriented to the ceiling for the lighting part.
As I haven't got lens that allow me to really do proxy-photography or at least the picture I wanted, this one was shot with my 70-200 at 200mm and placed approximatively at 1.2 meters (its minimal focus distance). After some tests for placement of the camera and the page, I obtain a satisfying resultat to my eyes with the book page diagonally and a short field depth with a aperture set to f/4.

The second phase was done during the post production. First of all, as I can't took the photo as near as I wished, I crop and make some correction to the orentation to get the word Green ("Vert") exactly where I wanted it to be.

Then, I corrected slightly the white balance (the picture was shot in RAW for that) and added vignetting still to focus the gaze on the word green. At last a little sharpness reenforcement. Here is for the development part of the RAW file.

I was there with my photography of a dictionnary page on the word green but this one was exactly like all other words on the page written with black ink. To get it highlight and corresponding to the exhibition theme, I choosed to select all letters of the word green (here "Vert, verte") and replace the color by a green one.
And here is the final result.
Bonjour à tous,

Ce mois-ci je participe a une expo photo. Comme a mon habitude, n'ayant pas vraiment pris le temps de travailler a l'avance sur le thème de celle-ci, qui vous l'aurez devinez au titre, est "la couleur verte (hors végétation)".
J'ai donc, la veille du jour on l'on trie et valide les photos participant à l'exposition dans mon club photo, pris quelques photos sur une idée qui me trottait dans la tête depuis pas mal d'année et qui m'avait été inspiré lors d'un concours photo.

Celle-ci consistait à prendre en photo une page du dictionnaire mais pas n'importe laquelle bien sur, celle ou on à la définition de vert. Puis de lui donné un petit effet supplémentaire au post traitement en changeant la couleur des lettres du mot vert.
Il a d'abord fallu que je choisisse parmi l'ensemble des dico disponible quel est celui qui pourrais rendre le mieux en photo. Je regarde alors un Larousse illustré pour des enfant de 7 ans en espérant peut être que le rendu soit agréable mais la présentation de celui-ci ne me plait pas pour l'idée de photo que j'ai. Je récupère donc un dico Hachette et m’arrête sur ce choix.
Ni une ni deux, j'ai installé un fond noir sur lequel est posé le dictionnaire ouvert a la bonne page, suivi de mon flash cobra dirigé vers le plafond pour l'éclairage.
N'ayant pas d'objectif me permettant de faire de réellement de la proxy ou du moins pour avoir la photo que je désirais, celle-ci a été faite avec mon 70-200 a 200mm placé à 1,2m (sa distance minimal de mise au point). Après plusieurs essais pour l'orientation et le placement de la page j'ai obtenu un résultat plutôt satisfaisant à mes yeux avec la page en diagonale et une faible profondeur de champ grace a une ouverture a f/4.

La seconde phase c'est faite lors de la post production. Tout d'abord n'ayant pu prendre la photo d'aussi prêt que je l'aurais voulu, je réalise un recadrage et une petite correction de l'orientation de la photo afin d'avoir le mot vert exactement ou je le voulais.
Ensuite, j'ai corriger légèrement la balance des blanc (la photo ayant été prise ne RAW pour cela) et ajouté un vignettage pour concentrer le regard toujours sur le mot vert, puis terminer par un petit renforcement de la netteté. Voila pour la partie purement développement du RAW.
Je me retrouvais alors avec la photo d'une page de dico sur le mot vert mais ce dernier était comme tout les autres écrit a l'encre noir. Pour encore plus le faire ressortir et correspondre au thème de l'expo, j'ai choisi de sélectionner dans mon logiciel d'édition de photo les lettres de "vert, verte" puis effectué un remplacement de couleur par du vert.
Et voici le résultat.


iso 100 - 200mm - f/4 at 1/2sec.

Jeremie BL
dimanche 3 février 2013

Touching the shadow

Hi all,

After some health concerns and the time to resume a normal schedule, I can, at last, get on with my post.

I wished since I bought Syl Arena's book, train myself with my speedlite, it's done and I have to continue...
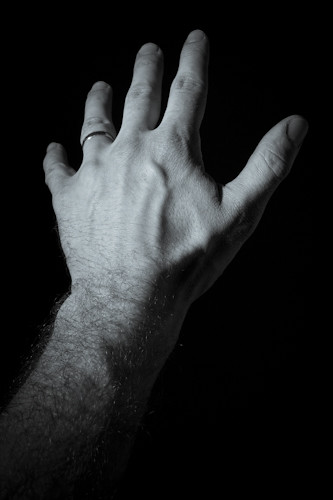
Here you are a picture of my hand with a quiet simple lightning schema. A speedlite on the left and a little upward with a reflector, on the other side, to send back the light and detach the hand from the background.

I first tried to do this picture using my strobe with a snoot but the lighted area was too small. The snoot taken off and the zoom of my speedlite set to 105mm was enough, in my opinion, to get lighted area large enough.

I wanted with this lighting, to just higlight my hand and give a feeling of loneliness with the shadow surrounding. Thus, during the post processing, I modified a few the exposition, change the picture in black and white, then add a vignetting to avoid my harm to attract the eyes.

Bonjour à tous,

Après quelques soucis de santé et le temps de reprendre un emploi du temps normal, je peu enfin reprendre le cours de mes posts.

Je souhaitais depuis l'achat du livre de Syl Arena, m’entraîner avec mon flash cobra, c'est chose faite et il faudra que je continue...
Voici donc une photo de ma main avec un schéma d'éclairage des plus simple. Un flash cobra sur la gauche et en hauteur ainsi qu'un réflecteur, de l'autre coté, pour renvoyer un peu de lumière et détacher la main du fond.

j'ai d'abord essayé de réaliser cette photo en utilisant mon flash avec un snoot mais la zone éclairée était trop petite. Le snoot enlevé et le zoom de mon flash sur 105mm a suffit, à mon sens, à donner une zone éclairée suffisamment grande.

Je voulais par cet éclairage faire juste ressortir ma main et donner l'impression de solitude avec l'ombre l'enveloppant. Pour cela, au post-traitement, j'ai modifié un peu l'expo, traité la photo en noir et blanc, puis ajouter un vignetage afin d'éviter que mon bras n'attire trop le regard.


iso 100 - 35mm - f/16 at 1/50sec.

Jeremie BL

jeudi 23 août 2012

Food Photography part II / Photo Culinaire Partie II

Hi all,

Here is three months that I have not posted on my blog and I change it with this post. Indeed, this mid-year was more ans less busy and beside few tries of photography, I did not found or took the time to write.

In this post, I continue my tests of food photography for a photography contest that will be this year at Villebon in November "Le coquetier numérique" that could be translated word-for-word to "digital egg cup". The name of the contest is related to the price received by the winning photography club. My firsts tests were those with glasses and biscuits during last April.
The series of picture I'll present you here came from an idea that appears during shopping in a Swedish store. We saw some nice egg cup for few shots to submit at the contest.

After several tests pictures to find a disposal, a background and a staging for those egg cups and eggs, I still not found a shot good enough for me or standing out. However, I get a preference for my last pictures with the egg cups.

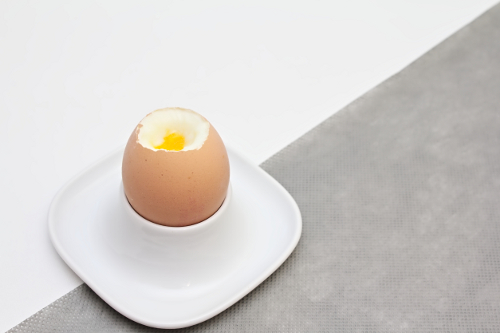
For the last shot, I tried to do some minimalist picture or something close to it. I prepare this picture by placing a white background on a coffee table, added a gray placemat over and at last the egg cup with a soft-boiled egg. For the light, a window behind the coffee table provides me soft ambient light mainly because it was around 9 PM. In additional to this natural light from the window, I use my speedlight with an indirect flash to the ceiling. This has help me to avoid last shadows that should be present except those under the egg cup.

I took this scene with my 18-55 zoom at 41mm, the focus was set to manual, aperture to f/8.0 and speed to 1/15s. This shutter speed allow me to get enough ambient light in addition to the speedlight. I do not remember the setting on the flash but I think it was around 1/8 of its full power. here is the final result.

Bonjour à tous,

Voici trois mois que je n'avais pas posté sur mon blog et j'y remédie par ce post. En effet, ce milieu d'année a été plutôt chargé et malgré quelques essais de photographie, je n'ai pas trouvé ou pris le temps de d’écrire.

Dans ce post, je continue mes tests de photo culinaire pour mon concours photo de la rentrée le coquetier numérique qui ce déroulera cette année à Villebon. Mes premiers essais étant ceux des verres et des biscuits du mois d'avril dernier.
La série de photo que je vais vous présenter ici est venue d'une idée qui m'est apparue pendant des courses dans un magasin d'ameublement et décoration suédois. Nous avons aperçu au rayon vaisselle des coquetiers plutôt sympa pour faire quelques prises de vues afin de soumettre des photos au concours.

Après plusieurs photos de tests afin de trouver une disposition, un fond, une mise en scène pour ces coquetier et les œufs, je n'ai toujours pas trouvé un cliché qui me convenait et sortait vraiment du lot. j'ai toutefois eu un petit plus pour mes dernières photos avec le coquetier.

Pour la dernière prise de vue, j'ai voulu faire dans le minimalisme ou du moins quelques choses s'y rapprochant, la prise de vue c'est déroulée en plaçant un fond blanc sur une table base sur lequel j'ai simplement rajouter un set de table gris et enfin le coquetier. Pour ce qui est de l'éclairage, une fenêtre placée derrière me donnait une lumière d'ambiance douce surtout par ce début de soirée, la photo ayant été prise vers 21h00. En plus de l'éclairage naturel provenant de la fenêtre j'ai donné un petit coup de flash indirect sur le plafond, ce qui m'a permis d'éviter les dernières ombres qui pouvaient restées en dehors du dessous du coquetier.

J'ai pris cette scène avec mon zoom 18-55 a la focale de 41mm en manuel a une ouverture de f/8.0 et une vitesse de 1/15s. le 1/15 me permettant de faire entrer la lumière ambiante en présence du flash. je n'ai plus la valeur exacte de la puissance du flash mais je crois que je l'avais réglé au alentour de 1/8e de sa puissance. En voici le résultat final.


iso 100 - 41mm - f/8 at 1/15sec.

Jeremie BL

lundi 14 mai 2012

At ground level / Au ras du sol

Hi all,

I'll participate, next week, to another exhibition which theme is "At ground level", an unusual viewpoint, one that we could discover lying face down on the ground...

At first sight, a large and easy theme, but if we think about it, pictures we could take on it, specially when we wanted to stick to the theme are not so easily made. If you are too close, it give the sensation not to be face down just lying on the ground but standing up in front of it and the rendering won't be as desired.

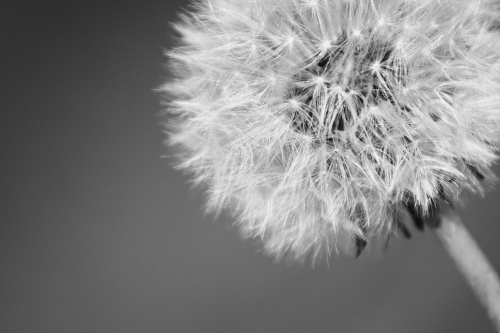
In my case, I chosen, for this exhibition, the picture of my dog taken in April, see my previous post, and a picture of dandelion. It grows in abundance in our garden during this period of the year. This picture has not been approved because in this case too, if we really want to respect precisely the theme, we have not this sensation at first sight on the picture, that it was taken lying face down, yet it was the case.

I wanted, still, show it to you as I like what I have done on it.
The shooting was done a Thursday at end of the afternoon, just before leaving for this theme validation meeting of our photo club. On the initial picture here, the dandelion was taken vertically and not leaning.
Bonjour à tous,

Je participe, la semaine prochaine, à une nouvelle exposition dont le thème est "Au ras du sol", Un point de vue inhabituel, celui que l’on peut découvrir allongé à plat ventre au sol...

A priori un thème suffisamment large et facile, mais si l'on y regarde à deux fois les photos que l'on peut prendre pour ce thème et que l'on cherche à coller vraiment à celui-ci ce n'est pas si simple. Si l'on est trop proche du sujet la photo que l'on prends donne l'impression d'être prise alors que l'on était debout et le rendu ne sera pas du tout celui désiré.

Dans mon cas, j'avais choisi pour cette exposition la photo de ma chienne que j'avais prise fin Avril, voir mon post précédent, ainsi qu'une photo de pissenlit. Il en pousse à foison dans nos jardins en cette période de l'année. Cette dernière n'a pas été retenue car la aussi, si l'on veut respecter le thème très précisément nous n'avons pas cette sensation dès le premier regard posé sur la photo qu'elle ai été prise en étant couché sur le sol, ce qui était pourtant le cas.

Je voulais tout de même vous la montrer car j'aime bien ce que j'en ai fait.
La prise de vue a été faite un jeudi en fin d'après midi, juste avant de partir pour la soirée de validation du thème au club photo. Sur la photo initiale que voici, le pissenlit est pris verticalement et non penché.


iso 100 - 200mm - f/4 at 1/1250sec.


It is indeed, when I imported the raw file on my computer that I found this one haven't the wow effect. I immediately tried to rotate the picture. Then a black and white conversion and sharpness accentuation was enough to give the final result.
What I appreciate on this picture, is the delicate blend between seed head that are sharp on the front and the bokeh and rear ones providing a voluptuous effect on the overall.
C'est en effet, lorsque j'ai importé le fichier brut sur mon ordinateur que j'ai trouvé celle-ci sans plus de pêche que ça. J'ai toute de suite essayé de faire une petite rotation. Suite à ça une conversion en noir et blanc puis une accentuation de la netteté on suffit pour donner le résultat final.
Ce que j'apprécie sur cette photo, c'est ce mélange entre les têtes de graines qui sont nettes sur le devant et celles qui sont flou sur l'arrière donnant un coté voluptueux à l'ensemble.


iso 100 - 200mm - f/4 at 1/1250sec.


Jeremie BL

lundi 23 avril 2012

Dog Portrait / Portrait de Chien

Hi all,

Welcome on this post on my blog Pictures of a World. Today, I present you a picture of our dog that I have done after an operation at the vet.
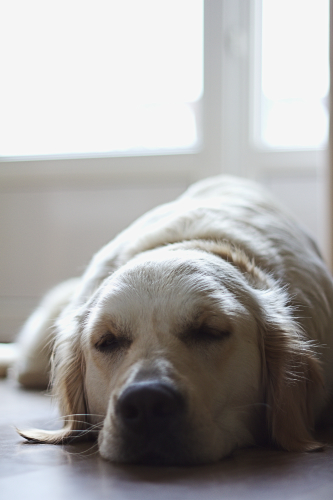
Galaxie, it's her name, was still under the effect of anesthesia and was dozing gently. Normally, very curious and come sniffing the lens once she see that we try to take a photography of her, she didn't move. I take the oppotunity to make some portraits.
Bonjour à tous,

Bienvenue sur ce post de Pictures of a World. Aujourd'hui, je vous présente une petite photo de notre chienne que j'ai réaliser après une opération chez le véto.
Etant encore sous les effet de l'anesthésie, Galaxie, c'est son nom, somnolait doucement. Elle qui d'habitude est très curieuse viens renifler l'objectif dès qu'elle voit que l'on essaye de la prendre en photo, ne bougeait plus. J'en ai donc profité pour faire quelques portraits d'elle.


iso 400 - 50mm - f/1.8 at 1/50sec.


Galaxie was lying back to the window, allowing me to take her in backlighting and keep an onieric ambiance getting close to high-key (pictures where the general tonality is in bright values) without beeing real high-key.
Anyway, her position forced me, despite the relatively low light that pass through the window due to cloudy weather, to choose between a good exposition of her head with almost burn light in th window or keeping the window correctly exposed and her head in shadow.
That is to say if the choice was simple, I just need some test and tuning to get a good result then the good picture.
The camera was set in aperture priority at f/1.8, to get a very short depth of field and intensify the hazy effect on the picture expect her eyes. The camera had, then, calculate the speed to 1/50 secondes that I have completed by a exposure correction of +2/3EV, hence the nearly over-exposed picture.
I think I could get almost the same result by setting the metering mode(exposure calculation) not in evaluative one but in spot on Galaxie's muzzle.
Galaxie était couchée dos à la fenêtre, permettant de la prendre en contre jour et de garder une ambiance onirique en se rapprochant du High key (photo dont la tonalité générale se trouve dans les valeurs claires) sans toutefois en être vraiment.
De toute façon, sa position m'obligeait, malgré la lumière relativement faible qui passait par la fenêtre du au temps couvert, à choisir entre bien exposer sa tête et avoir une lumière presque brulée ou avoir la fenêtre bien exposée et sa tête dans l'ombre.
C'est pour vous dire si le choix était vite fait, il m'a juste fallu quelques essais et réglages pour arriver au bon résultat.
L'appareil en priorité ouverture à f/1.8, afin d'avoir une très faible profondeur de champs et renforcer l'effet brumeux de la photo en dehors des yeux. Le boitier a ensuite calculé un vitesse de 1/50 de seconde que j'ai compléter par une correction de l'exposition de +2/3IL, d'où la photo donnant sur le sur-exposé.
Je pense que j'aurais pu procéder aussi en mettant le calcul de l'exposition non plus en evaluative, mais en spot sur le museau de Galaxie.

Jeremie BL

mardi 3 avril 2012

Food Photography / Photographie Culinaire

Hi all,

Following my post of March 22 on the Syl Arena's book, I desired practice on things I remembered.
For the opportunity, I said to my self it was a good idea to prepare some shoot for a contest with my photo club, the contest will take place in late Autumn 2012.
The theme will be "Yum Yum". Thus I have to check what I could do for this kind of very global theme. Initially, I immediately thought about food and beverage photography, despite they are many other ways to work on it (staging with food, photo report, and so on).
In additional, it was a long time, years, that I saw a Ronan Palliser article on the digital photography school website that interested me and gave me the urge of making some shoot about food photography that should be used, also, as decoration for the kitchen or dining room.


Why have I not done those pictures earlier ? First, because I didn't try and then, because, at the time, I was missing some hardware.
Principally a flash (Canon speedlite 430 EXII) not the little one from the camera, flashgun I bought near a year now, but also something that help me moving my speedlite off-camera, that was more than necessary.


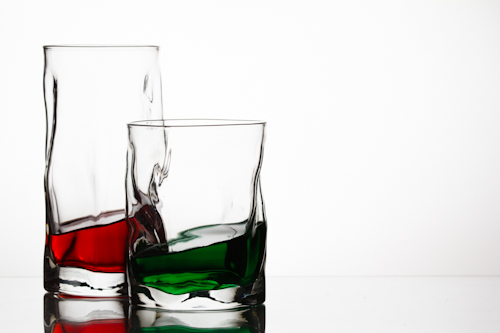
So I strongly inspired myself, for the first of my pictures of this post, from Ronan Palliser's article : "Cooking up a Photograph in your kitchen". The hardware used is very simple, a good worktop like an ironing board or a board on trestles, white paper sheets, a glass from a photo frame, all necessary photography stuff (camera, flashgun, wireless trigger or sync cable, tripod) and your imagination.
On this basis, I haven't change a lot of things, following the post, I prepare the ironing board (for once that a man get the ironing board out of the closet, it's not even for ironing clothes), on which I put the back of a 30x40cm photo frame, two A3 format white paper sheets then the glass.
To get stylish pictures, I tilt this support with a metal box for cookies under one of it side and blocking the other side with a wooden cutting board to avoid the support to slip down.


We've got now our tilting base were we can put our glasses, then make a white background. The background is just the back of a poster put on two bar chairs and held open and vertical by a big piece of cardboard.
It is time to pose the glasses on the support. As it is leaning, if we put glasses as this they would have slipped. thus I manage to get pieces of double sided adhesive tape below each glasses to hold them in place.
Some water and few drops of food coloring end up to give good style to our subject.


To finalize my improvised photo studio, I still have to put my camera on the tripod and my unique speedlite with wireless trigger Cactus V5 under the ironing board to get a well lit background, while ensuring that both, flash and background, are not too far of glasses to lit them by bouncing back a maximum of the light.
As Ronan explain, "The secret to lighting glass is to not light the glass. You need to light the background, and the light that bounces back from that will backlight the glasses nicely."


After a first shoot in Aperture priority at f/8 (to get a good depth of field, maybe still too short) and without flash to determine the good Aperture/speed couple to use in manual mode on my camera in order to get the light of my flash as the primary one, in my case 1/200 at f/8.
Then begun the moment to set the power of the speedlite, at 1/16 of it maximal power, thanks to other tests pictures, to get a white background without getting it burned or glasses edges with flare.


During the shooting, some additional accessories were inserted to get a better render: two white placemats on each side, hold in place with chopsticks, to define a little bit more glasses edges.
Here we have a great mini-homemade-studio done with what was available ... ;) ... and the final result :
Bonjour a tous,

Suite à mon post du 22 mars dernier sur le livre de Syl Arena, j'ai désiré mettre en pratique ce que j'ai bien pu retenir.
Pour l'occasion, je me suis dis que c'était une bonne idée de préparer quelques photos pour un concours avec mon club photo qui aura lieu à la fin de l'automne 2012.
Le thème de ce concours sera "Miam Miam". Il a donc fallut que je regarde ce qui pouvait se faire sur ce genre de thème très large. Dans un premier temps, j'ai tout de suite pensé à de la photo culinaire, bien qu'il y ai d'autres façons de travailler dessus (mise en scène avec de la nourriture, photo reportage, ...).
En plus, cela faisait un certain temps, qui se compte en année, que j'avais aperçu un article de Ronan Palliser sur le site de digital photography school qui m'avait interpelé et donné l'envie d'effectuer quelques photos culinaire qui pourraient à l'occasion servir aussi de déco pour la cuisine ou la salle à manger.

Pourquoi ne pas avoir réalisé ces photos plutôt me direz-vous ? D'une part, parce que je n'avais pas essayé de les faire, et d'autre part , à l'époque, parce qu'il me manquait du matériel.
Principalement un flash (Canon speedlite 430 EXII) pas celui du boitier, flash cobra que j'ai acquis il y a maintenant près d'un an, mais aussi de quoi le déporter de mon boitier ce qui est plus que nécessaire.

Je me suis donc fortement inspiré pour la première des deux photos de l'article de Ronan Palliser : "Cooking up a Photograph in Your Kitchen". Le matériel utilisé est relativement simple. Un "bon" plan de travail du type planche à repasser ou planche sur des trétaux, des feuilles de papier blanc, une palque de verre ou de plexiglass, le matériel photo qui va bien et un peu d'imagination pour la suite.
Sur la base je n'ai pas changer grand chose, en suivant le post, j'ai préparé la table à repasser (pour une fois qu'un homme la sors, ce n'est même pas pour faire le repassage), sur laquelle j'ai posé le dos d'un cadre photo de 30x40cm, deux feuilles de papier A3 puis le verre du cadre.
Histoire de donner un peu de cachet à mes photos, j'ai mis ce support de biais en posant un coté sur une boite à gateau et en la coinçant de l'autre, pour ne pas que le tout glissent, par une bonne vieille planche à découper en bois.

Nous avons maintenant le support oblique pour poser nos verres, attaquons nous au fond blanc. Le fond n'est qu'un simple poster en papier glacé de dos et poser sur deux chaises de bar puis maintenu bien déplié et vertical avec une plaque de carton.
Il est maintenant temps de poser les verres sur le support. Etant sur une base penchée, poser les verres comme ça et tout aurait valsé. j'ai donc pis un peu de scotch transparent double face sous les verres pour qu'ils restent en place.
Un peu d'eau dedans et quelques goutes de colorants alimentaires qui trainaient dans les placards finissent de donner un peu de style à notre sujet.

Pour finaliser mon studio photo improvisé, je n'avais plus qu'a placer mon appareil sur son pieds et mon unique flash avec son recepteur radio Cactus V5 sous la planche à repasser de facon à bien éclairer le fond uniformément tout en veillant à ce que les deux, flash et fond, ne soit pas trop distant des verres pour que ces deniers recoivent à leur tour un maximum de lumière.
Car comme le dis Ronan, une bonne astuce pour ne pas avoir de reflets désagréables, est de ne pas éclairer directement les verres mais de le faire via le fond.

Après une première photo en mode priorité ouverture sur f/8 (pour diposer d'une profondeur de champ correcte, peut-être un peu courte encore) et sans le flash permettant de détermnier l'ouverture et la vitesse nécessaire sur le boitier en manuel pour que le flash devienne ma lumière principale sur la photo dans mon cas 1/200s et f/8.
Viens en suite le réglage du flash en manuel, à 1/16 de sa puissance, grâce à d'autre photos de tests pour avoir un fond blanc mais sans le bruler ni avoir le bord des verres mal défini à cause de reflets.

Pendant la prise de vu quelques accessoires suplémentaire ont été inséré pour améliorer un peu le rendu: des sets de table blanc de chaque coté, tenu par des baguettes chinoise, pour définir un peu plus le bord des verres.
En voila un beau mini-studio maison fait avec les moyens du bord ... ;) ... et le résultat final :

iso 100 - 93mm - f/8 at 1/200sec
with off-camera flash at 1/16 of its power.


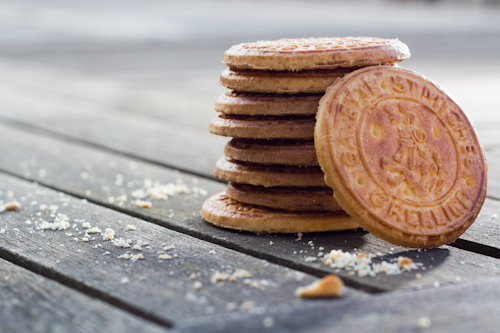
The second picture needs significantly fewer resources and time, a wooden garden table, sun light from an end of March sunset, some Breton biscuits, my camera and my flashgun.
The principle was then alsmost the same. A first picture in Aperture priority at f/5.6, giving me enough depth of field for biscuits but with a quick fall off into blur, to determine the Aperture/Speed couple giving me the ambiant lighting exactly as I wanted.
After some pictures without flash, I put the speedlite on the right side and a slightly behind, to give more relief on biscuits and detach them even more from the background.

Here is one photography from my shooting. I must try to get other shots whith partialy eaten biscuits that should give a different style to pictures.


La deuxième photo a nécéssité nettement moins de moyens et de temps, une table de jardin en bois, les rayons de soleil d'une belle fin d'après midi de Mars, quelques galettes bretonnes au beurre, mon appareil et mon flash.
Le principe est ensuite rester plus ou moins le même. Une première photo sans le flash en priorité ouverture f/5.6, ouverture me donnant suffisament de profondeur pour les gateaux mais laissant très rapidement le fond flou, pour déterminer le couple ouverture-vitesse donnant le rendu de l'éclairage ambiant tel qu'on je le souhaitais.
Après quelques photos sans flash, j'ai positionner celui-ci sur le coté droit, légèrement en arrière, afin de donner un peu plus relief sur les galettes et les détacher encore plus du fond.

En voici une du lot que j'ai réaliser. Il faudra que j'essaye de mettre en place d'autres mise en scène comme des biscuits en partie mangés qui pourait donner un autre style aux photos.


iso 100 - 50mm - f/5.6 at 1/80sec
with off-camera flash at 1/32 of its power.


Jeremie BL

jeudi 22 mars 2012

My Photography books / Ma bibliothèque photo

Hi all,


This week, I post on a book that is for me a good reference on how to use flashes and deal with lights.
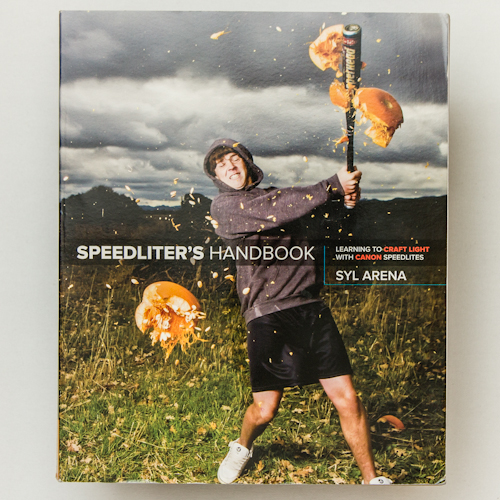
If you want to deepen your knowledge on the lighting of your pictures in general and specifically with flashes (Canon in this case but the theory is still applicable for all brand of flashes) don't hesitate to look at the Syl Arena's book : Speedliter's handbook, Learning to craft light with Canon Speedlites.

I have, for my part, the English version of the book but for french speaking people the book should be translate and available in France at the end of March or beginning of April. It allows, for those who have some experience on the subject, to get a booster shot and discover from Syl Arena experiences a lot of tricks for Speedlite lighting.


This book begins by the basis on photography, control of the aperture, speed, White balance and so on, to explain how you can use them when you take pictures with a flash. And differents effects that a speedlite could produce relative to its position to the subject.
Then Syl Arena describe all different accessories that could be used (diffusion like through a soft-box, reflection like bouncing off an umbrella and modify the color with gels) with a lot of examples, practical cases and tips for purchase and their utility.
At last the book end with several picture with flash examples beside a full description on how Syl Arena has realized them.

This book is, I found, an excellent reference on how realize better pictures using flashes and how to better manage light in your photos to match the way you want to be rendered. It is available in english on the Internet around 35€ and should be available in your favorite bookstore in french this time.

You can also go to his blog here.
Bonjour à tous,


Cette semaine, je poste sur un livre qui est pour moi une bonne référence sur comment utiliser vos flashs cobra et jouer avec la lumière pour vos photos.
Si vous souhaitez approfondir vos connaissances sur l'éclairage de vos photos en général et plus particulièrement avec des flashes cobra (Canon en l’occurrence, mais la théorie reste valable pour tout les flash à priori) n'hésitez pas à regarder le livre de Syl Arena : Speedliter's handbook, Learning to craft light with Canon Speedlites.

J'ai pour ma part, la version anglaise du livre mais ce dernier est censé sortir en France traduit d'ici la fin du mois Mars ou début Avril. Ce livre permet, pour ceux qui on déjà une bonne connaissance du sujet, de faire une piqure de rappel et de découvrir de par le retour d'expérience de Syl Arena, plein d'astuces pour l'éclairage au flash cobra.


Le livre commence par reprendre les bases de la photo, du contrôle de l'ouverture, la vitesse d'obturation, la balance des blancs et j'en passe, pour vous expliquer comment les utiliser quand vous faite des photos avec un flash. Ainsi que les différents effets que produit un flash suivant sont emplacement par rapport au sujet.
Ensuite Syl Arena décrit les différents types d'accessoires utilisables (diffuseurs comme des softbox, réflecteurs tel qu'un parapluie et modification de la couleur avec les gels) avec de nombreux exemples, cas pratiques et conseils pour leurs achats et leurs utilités.
Enfin le livre ce termine par un certains nombre d'exemples de photos au flash accompagnés d'une description précise de comment Syl les a réalisées.


Ce livre est, je trouve, une excellente source d'information sur comment réaliser de meilleures photos en utilisant un flash cobra et de mieux gérer la lumière dans vos photos pour qu'elles correspondes au rendu que vous voulez. Il est disponible en anglais par internet très facilement pour un prix d'environ 35 € et devrait etre d'ici peu en librairie cette fois-ci en francais.

Vous pouvez aussi aller faire un petit tour sur son blog par ici.


Syl Arena - Speedliter's handbook
ISBN-13: 978-0321711052

Jeremie BL