lundi 14 mai 2012

At ground level / Au ras du sol

Hi all,

I'll participate, next week, to another exhibition which theme is "At ground level", an unusual viewpoint, one that we could discover lying face down on the ground...

At first sight, a large and easy theme, but if we think about it, pictures we could take on it, specially when we wanted to stick to the theme are not so easily made. If you are too close, it give the sensation not to be face down just lying on the ground but standing up in front of it and the rendering won't be as desired.

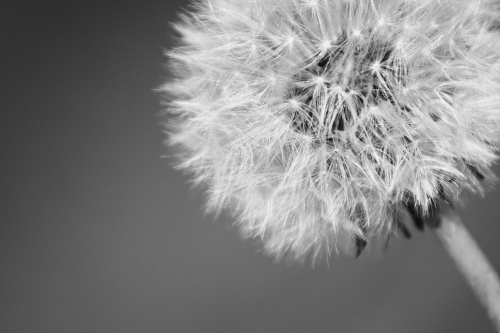
In my case, I chosen, for this exhibition, the picture of my dog taken in April, see my previous post, and a picture of dandelion. It grows in abundance in our garden during this period of the year. This picture has not been approved because in this case too, if we really want to respect precisely the theme, we have not this sensation at first sight on the picture, that it was taken lying face down, yet it was the case.

I wanted, still, show it to you as I like what I have done on it.
The shooting was done a Thursday at end of the afternoon, just before leaving for this theme validation meeting of our photo club. On the initial picture here, the dandelion was taken vertically and not leaning.
Bonjour à tous,

Je participe, la semaine prochaine, à une nouvelle exposition dont le thème est "Au ras du sol", Un point de vue inhabituel, celui que l’on peut découvrir allongé à plat ventre au sol...

A priori un thème suffisamment large et facile, mais si l'on y regarde à deux fois les photos que l'on peut prendre pour ce thème et que l'on cherche à coller vraiment à celui-ci ce n'est pas si simple. Si l'on est trop proche du sujet la photo que l'on prends donne l'impression d'être prise alors que l'on était debout et le rendu ne sera pas du tout celui désiré.

Dans mon cas, j'avais choisi pour cette exposition la photo de ma chienne que j'avais prise fin Avril, voir mon post précédent, ainsi qu'une photo de pissenlit. Il en pousse à foison dans nos jardins en cette période de l'année. Cette dernière n'a pas été retenue car la aussi, si l'on veut respecter le thème très précisément nous n'avons pas cette sensation dès le premier regard posé sur la photo qu'elle ai été prise en étant couché sur le sol, ce qui était pourtant le cas.

Je voulais tout de même vous la montrer car j'aime bien ce que j'en ai fait.
La prise de vue a été faite un jeudi en fin d'après midi, juste avant de partir pour la soirée de validation du thème au club photo. Sur la photo initiale que voici, le pissenlit est pris verticalement et non penché.


iso 100 - 200mm - f/4 at 1/1250sec.


It is indeed, when I imported the raw file on my computer that I found this one haven't the wow effect. I immediately tried to rotate the picture. Then a black and white conversion and sharpness accentuation was enough to give the final result.
What I appreciate on this picture, is the delicate blend between seed head that are sharp on the front and the bokeh and rear ones providing a voluptuous effect on the overall.
C'est en effet, lorsque j'ai importé le fichier brut sur mon ordinateur que j'ai trouvé celle-ci sans plus de pêche que ça. J'ai toute de suite essayé de faire une petite rotation. Suite à ça une conversion en noir et blanc puis une accentuation de la netteté on suffit pour donner le résultat final.
Ce que j'apprécie sur cette photo, c'est ce mélange entre les têtes de graines qui sont nettes sur le devant et celles qui sont flou sur l'arrière donnant un coté voluptueux à l'ensemble.


iso 100 - 200mm - f/4 at 1/1250sec.


Jeremie BL

lundi 23 avril 2012

Dog Portrait / Portrait de Chien

Hi all,

Welcome on this post on my blog Pictures of a World. Today, I present you a picture of our dog that I have done after an operation at the vet.
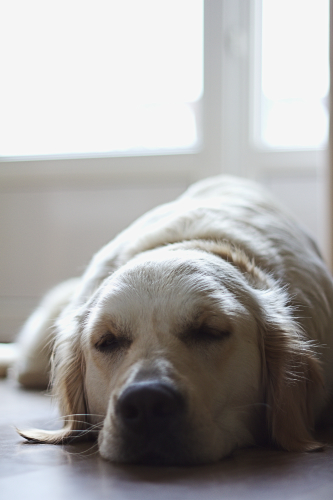
Galaxie, it's her name, was still under the effect of anesthesia and was dozing gently. Normally, very curious and come sniffing the lens once she see that we try to take a photography of her, she didn't move. I take the oppotunity to make some portraits.
Bonjour à tous,

Bienvenue sur ce post de Pictures of a World. Aujourd'hui, je vous présente une petite photo de notre chienne que j'ai réaliser après une opération chez le véto.
Etant encore sous les effet de l'anesthésie, Galaxie, c'est son nom, somnolait doucement. Elle qui d'habitude est très curieuse viens renifler l'objectif dès qu'elle voit que l'on essaye de la prendre en photo, ne bougeait plus. J'en ai donc profité pour faire quelques portraits d'elle.


iso 400 - 50mm - f/1.8 at 1/50sec.


Galaxie was lying back to the window, allowing me to take her in backlighting and keep an onieric ambiance getting close to high-key (pictures where the general tonality is in bright values) without beeing real high-key.
Anyway, her position forced me, despite the relatively low light that pass through the window due to cloudy weather, to choose between a good exposition of her head with almost burn light in th window or keeping the window correctly exposed and her head in shadow.
That is to say if the choice was simple, I just need some test and tuning to get a good result then the good picture.
The camera was set in aperture priority at f/1.8, to get a very short depth of field and intensify the hazy effect on the picture expect her eyes. The camera had, then, calculate the speed to 1/50 secondes that I have completed by a exposure correction of +2/3EV, hence the nearly over-exposed picture.
I think I could get almost the same result by setting the metering mode(exposure calculation) not in evaluative one but in spot on Galaxie's muzzle.
Galaxie était couchée dos à la fenêtre, permettant de la prendre en contre jour et de garder une ambiance onirique en se rapprochant du High key (photo dont la tonalité générale se trouve dans les valeurs claires) sans toutefois en être vraiment.
De toute façon, sa position m'obligeait, malgré la lumière relativement faible qui passait par la fenêtre du au temps couvert, à choisir entre bien exposer sa tête et avoir une lumière presque brulée ou avoir la fenêtre bien exposée et sa tête dans l'ombre.
C'est pour vous dire si le choix était vite fait, il m'a juste fallu quelques essais et réglages pour arriver au bon résultat.
L'appareil en priorité ouverture à f/1.8, afin d'avoir une très faible profondeur de champs et renforcer l'effet brumeux de la photo en dehors des yeux. Le boitier a ensuite calculé un vitesse de 1/50 de seconde que j'ai compléter par une correction de l'exposition de +2/3IL, d'où la photo donnant sur le sur-exposé.
Je pense que j'aurais pu procéder aussi en mettant le calcul de l'exposition non plus en evaluative, mais en spot sur le museau de Galaxie.

Jeremie BL

mardi 3 avril 2012

Food Photography / Photographie Culinaire

Hi all,

Following my post of March 22 on the Syl Arena's book, I desired practice on things I remembered.
For the opportunity, I said to my self it was a good idea to prepare some shoot for a contest with my photo club, the contest will take place in late Autumn 2012.
The theme will be "Yum Yum". Thus I have to check what I could do for this kind of very global theme. Initially, I immediately thought about food and beverage photography, despite they are many other ways to work on it (staging with food, photo report, and so on).
In additional, it was a long time, years, that I saw a Ronan Palliser article on the digital photography school website that interested me and gave me the urge of making some shoot about food photography that should be used, also, as decoration for the kitchen or dining room.


Why have I not done those pictures earlier ? First, because I didn't try and then, because, at the time, I was missing some hardware.
Principally a flash (Canon speedlite 430 EXII) not the little one from the camera, flashgun I bought near a year now, but also something that help me moving my speedlite off-camera, that was more than necessary.


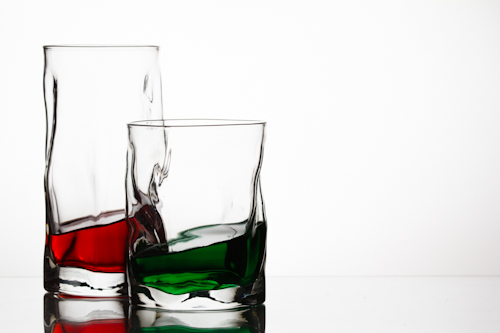
So I strongly inspired myself, for the first of my pictures of this post, from Ronan Palliser's article : "Cooking up a Photograph in your kitchen". The hardware used is very simple, a good worktop like an ironing board or a board on trestles, white paper sheets, a glass from a photo frame, all necessary photography stuff (camera, flashgun, wireless trigger or sync cable, tripod) and your imagination.
On this basis, I haven't change a lot of things, following the post, I prepare the ironing board (for once that a man get the ironing board out of the closet, it's not even for ironing clothes), on which I put the back of a 30x40cm photo frame, two A3 format white paper sheets then the glass.
To get stylish pictures, I tilt this support with a metal box for cookies under one of it side and blocking the other side with a wooden cutting board to avoid the support to slip down.


We've got now our tilting base were we can put our glasses, then make a white background. The background is just the back of a poster put on two bar chairs and held open and vertical by a big piece of cardboard.
It is time to pose the glasses on the support. As it is leaning, if we put glasses as this they would have slipped. thus I manage to get pieces of double sided adhesive tape below each glasses to hold them in place.
Some water and few drops of food coloring end up to give good style to our subject.


To finalize my improvised photo studio, I still have to put my camera on the tripod and my unique speedlite with wireless trigger Cactus V5 under the ironing board to get a well lit background, while ensuring that both, flash and background, are not too far of glasses to lit them by bouncing back a maximum of the light.
As Ronan explain, "The secret to lighting glass is to not light the glass. You need to light the background, and the light that bounces back from that will backlight the glasses nicely."


After a first shoot in Aperture priority at f/8 (to get a good depth of field, maybe still too short) and without flash to determine the good Aperture/speed couple to use in manual mode on my camera in order to get the light of my flash as the primary one, in my case 1/200 at f/8.
Then begun the moment to set the power of the speedlite, at 1/16 of it maximal power, thanks to other tests pictures, to get a white background without getting it burned or glasses edges with flare.


During the shooting, some additional accessories were inserted to get a better render: two white placemats on each side, hold in place with chopsticks, to define a little bit more glasses edges.
Here we have a great mini-homemade-studio done with what was available ... ;) ... and the final result :
Bonjour a tous,

Suite à mon post du 22 mars dernier sur le livre de Syl Arena, j'ai désiré mettre en pratique ce que j'ai bien pu retenir.
Pour l'occasion, je me suis dis que c'était une bonne idée de préparer quelques photos pour un concours avec mon club photo qui aura lieu à la fin de l'automne 2012.
Le thème de ce concours sera "Miam Miam". Il a donc fallut que je regarde ce qui pouvait se faire sur ce genre de thème très large. Dans un premier temps, j'ai tout de suite pensé à de la photo culinaire, bien qu'il y ai d'autres façons de travailler dessus (mise en scène avec de la nourriture, photo reportage, ...).
En plus, cela faisait un certain temps, qui se compte en année, que j'avais aperçu un article de Ronan Palliser sur le site de digital photography school qui m'avait interpelé et donné l'envie d'effectuer quelques photos culinaire qui pourraient à l'occasion servir aussi de déco pour la cuisine ou la salle à manger.

Pourquoi ne pas avoir réalisé ces photos plutôt me direz-vous ? D'une part, parce que je n'avais pas essayé de les faire, et d'autre part , à l'époque, parce qu'il me manquait du matériel.
Principalement un flash (Canon speedlite 430 EXII) pas celui du boitier, flash cobra que j'ai acquis il y a maintenant près d'un an, mais aussi de quoi le déporter de mon boitier ce qui est plus que nécessaire.

Je me suis donc fortement inspiré pour la première des deux photos de l'article de Ronan Palliser : "Cooking up a Photograph in Your Kitchen". Le matériel utilisé est relativement simple. Un "bon" plan de travail du type planche à repasser ou planche sur des trétaux, des feuilles de papier blanc, une palque de verre ou de plexiglass, le matériel photo qui va bien et un peu d'imagination pour la suite.
Sur la base je n'ai pas changer grand chose, en suivant le post, j'ai préparé la table à repasser (pour une fois qu'un homme la sors, ce n'est même pas pour faire le repassage), sur laquelle j'ai posé le dos d'un cadre photo de 30x40cm, deux feuilles de papier A3 puis le verre du cadre.
Histoire de donner un peu de cachet à mes photos, j'ai mis ce support de biais en posant un coté sur une boite à gateau et en la coinçant de l'autre, pour ne pas que le tout glissent, par une bonne vieille planche à découper en bois.

Nous avons maintenant le support oblique pour poser nos verres, attaquons nous au fond blanc. Le fond n'est qu'un simple poster en papier glacé de dos et poser sur deux chaises de bar puis maintenu bien déplié et vertical avec une plaque de carton.
Il est maintenant temps de poser les verres sur le support. Etant sur une base penchée, poser les verres comme ça et tout aurait valsé. j'ai donc pis un peu de scotch transparent double face sous les verres pour qu'ils restent en place.
Un peu d'eau dedans et quelques goutes de colorants alimentaires qui trainaient dans les placards finissent de donner un peu de style à notre sujet.

Pour finaliser mon studio photo improvisé, je n'avais plus qu'a placer mon appareil sur son pieds et mon unique flash avec son recepteur radio Cactus V5 sous la planche à repasser de facon à bien éclairer le fond uniformément tout en veillant à ce que les deux, flash et fond, ne soit pas trop distant des verres pour que ces deniers recoivent à leur tour un maximum de lumière.
Car comme le dis Ronan, une bonne astuce pour ne pas avoir de reflets désagréables, est de ne pas éclairer directement les verres mais de le faire via le fond.

Après une première photo en mode priorité ouverture sur f/8 (pour diposer d'une profondeur de champ correcte, peut-être un peu courte encore) et sans le flash permettant de détermnier l'ouverture et la vitesse nécessaire sur le boitier en manuel pour que le flash devienne ma lumière principale sur la photo dans mon cas 1/200s et f/8.
Viens en suite le réglage du flash en manuel, à 1/16 de sa puissance, grâce à d'autre photos de tests pour avoir un fond blanc mais sans le bruler ni avoir le bord des verres mal défini à cause de reflets.

Pendant la prise de vu quelques accessoires suplémentaire ont été inséré pour améliorer un peu le rendu: des sets de table blanc de chaque coté, tenu par des baguettes chinoise, pour définir un peu plus le bord des verres.
En voila un beau mini-studio maison fait avec les moyens du bord ... ;) ... et le résultat final :

iso 100 - 93mm - f/8 at 1/200sec
with off-camera flash at 1/16 of its power.


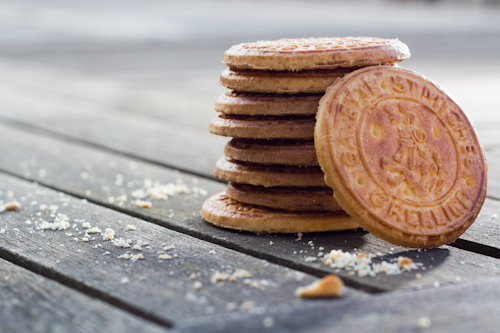
The second picture needs significantly fewer resources and time, a wooden garden table, sun light from an end of March sunset, some Breton biscuits, my camera and my flashgun.
The principle was then alsmost the same. A first picture in Aperture priority at f/5.6, giving me enough depth of field for biscuits but with a quick fall off into blur, to determine the Aperture/Speed couple giving me the ambiant lighting exactly as I wanted.
After some pictures without flash, I put the speedlite on the right side and a slightly behind, to give more relief on biscuits and detach them even more from the background.

Here is one photography from my shooting. I must try to get other shots whith partialy eaten biscuits that should give a different style to pictures.


La deuxième photo a nécéssité nettement moins de moyens et de temps, une table de jardin en bois, les rayons de soleil d'une belle fin d'après midi de Mars, quelques galettes bretonnes au beurre, mon appareil et mon flash.
Le principe est ensuite rester plus ou moins le même. Une première photo sans le flash en priorité ouverture f/5.6, ouverture me donnant suffisament de profondeur pour les gateaux mais laissant très rapidement le fond flou, pour déterminer le couple ouverture-vitesse donnant le rendu de l'éclairage ambiant tel qu'on je le souhaitais.
Après quelques photos sans flash, j'ai positionner celui-ci sur le coté droit, légèrement en arrière, afin de donner un peu plus relief sur les galettes et les détacher encore plus du fond.

En voici une du lot que j'ai réaliser. Il faudra que j'essaye de mettre en place d'autres mise en scène comme des biscuits en partie mangés qui pourait donner un autre style aux photos.


iso 100 - 50mm - f/5.6 at 1/80sec
with off-camera flash at 1/32 of its power.


Jeremie BL

jeudi 22 mars 2012

My Photography books / Ma bibliothèque photo

Hi all,


This week, I post on a book that is for me a good reference on how to use flashes and deal with lights.
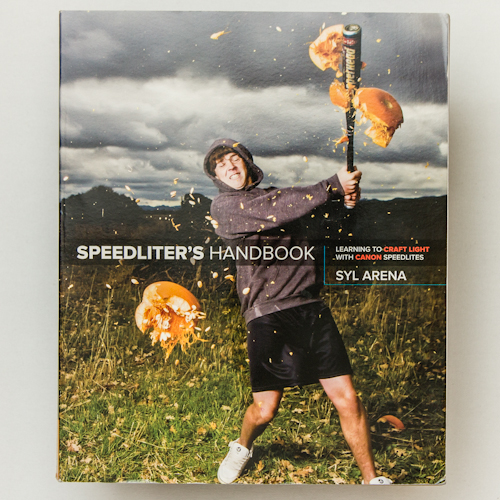
If you want to deepen your knowledge on the lighting of your pictures in general and specifically with flashes (Canon in this case but the theory is still applicable for all brand of flashes) don't hesitate to look at the Syl Arena's book : Speedliter's handbook, Learning to craft light with Canon Speedlites.

I have, for my part, the English version of the book but for french speaking people the book should be translate and available in France at the end of March or beginning of April. It allows, for those who have some experience on the subject, to get a booster shot and discover from Syl Arena experiences a lot of tricks for Speedlite lighting.


This book begins by the basis on photography, control of the aperture, speed, White balance and so on, to explain how you can use them when you take pictures with a flash. And differents effects that a speedlite could produce relative to its position to the subject.
Then Syl Arena describe all different accessories that could be used (diffusion like through a soft-box, reflection like bouncing off an umbrella and modify the color with gels) with a lot of examples, practical cases and tips for purchase and their utility.
At last the book end with several picture with flash examples beside a full description on how Syl Arena has realized them.

This book is, I found, an excellent reference on how realize better pictures using flashes and how to better manage light in your photos to match the way you want to be rendered. It is available in english on the Internet around 35€ and should be available in your favorite bookstore in french this time.

You can also go to his blog here.
Bonjour à tous,


Cette semaine, je poste sur un livre qui est pour moi une bonne référence sur comment utiliser vos flashs cobra et jouer avec la lumière pour vos photos.
Si vous souhaitez approfondir vos connaissances sur l'éclairage de vos photos en général et plus particulièrement avec des flashes cobra (Canon en l’occurrence, mais la théorie reste valable pour tout les flash à priori) n'hésitez pas à regarder le livre de Syl Arena : Speedliter's handbook, Learning to craft light with Canon Speedlites.

J'ai pour ma part, la version anglaise du livre mais ce dernier est censé sortir en France traduit d'ici la fin du mois Mars ou début Avril. Ce livre permet, pour ceux qui on déjà une bonne connaissance du sujet, de faire une piqure de rappel et de découvrir de par le retour d'expérience de Syl Arena, plein d'astuces pour l'éclairage au flash cobra.


Le livre commence par reprendre les bases de la photo, du contrôle de l'ouverture, la vitesse d'obturation, la balance des blancs et j'en passe, pour vous expliquer comment les utiliser quand vous faite des photos avec un flash. Ainsi que les différents effets que produit un flash suivant sont emplacement par rapport au sujet.
Ensuite Syl Arena décrit les différents types d'accessoires utilisables (diffuseurs comme des softbox, réflecteurs tel qu'un parapluie et modification de la couleur avec les gels) avec de nombreux exemples, cas pratiques et conseils pour leurs achats et leurs utilités.
Enfin le livre ce termine par un certains nombre d'exemples de photos au flash accompagnés d'une description précise de comment Syl les a réalisées.


Ce livre est, je trouve, une excellente source d'information sur comment réaliser de meilleures photos en utilisant un flash cobra et de mieux gérer la lumière dans vos photos pour qu'elles correspondes au rendu que vous voulez. Il est disponible en anglais par internet très facilement pour un prix d'environ 35 € et devrait etre d'ici peu en librairie cette fois-ci en francais.

Vous pouvez aussi aller faire un petit tour sur son blog par ici.


Syl Arena - Speedliter's handbook
ISBN-13: 978-0321711052

Jeremie BL

jeudi 23 février 2012

My last purchase (well, gift !) / Mon dernier achat (enfin, cadeau !)

Hi all,

This week no specific pictures to show you but rather an update of my gear. I can play for two months now with my last purchase, gift to be exact. Indeed, I received during Christmas, a new lens.
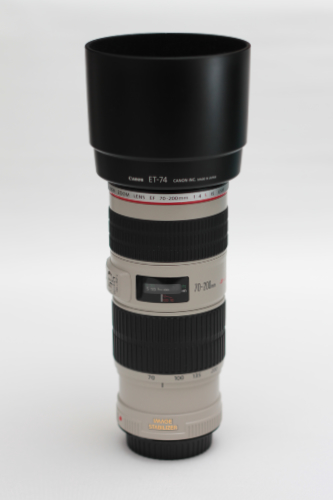
It is the Canon 70-200mm USM f/4 L IS.

This lens is a real beauty, and I can at last, after loosing a 18-200mm, get back to focal that I appreciate particularly. Even if only for portrait. In additional the quality of the lens is remarkable.

Bonjour à tous,

Cette semaine pas spécialement de photo à vous montrer mais plutôt une petite mise à jour de mon matériel. Cela fait deux mois maintenant que je peux m'amuser avec mon dernier achat, cadeau pour être exact. En effet, j'ai reçu à Noël, une nouvelle optique.
C'est le Canon 70-200mm USM f/4 L IS.

Cette optique est une petite merveille, et je peux enfin, suite à la perte d'un 18-200, renouer avec un des focales que j’apprécie tout particulièrement. Ne serait-ce que pour le portrait. En plus la qualité de ce caillou est remarquable.


This L Lenses is delivered with hood and flexible case to protect it. I already use it for several pictures as my bokeh effect on the Atomium (see my post on Brussels) and some other photos that I have not share or post yet.

Despite the multiplier effect of my camera (an EOS 550D ie 1.6) that represent a 112-320 lens in full-frame, and does not simplify shots on particular theme, I love work with this one. The focus is accurate and very quick due to the USM motorization and stabilization is doing really good job for me, having a little annoying habit of shaking hands.

Thus this is, a zoom that I recommend particularly. If you can found it on the second-hand market, don't hesitate after the usual checks, of course.

Cette optique est fournie avec son pare-soleil et une housse de protection. Je l'ai déjà utilisée pour quelques photo comme mon effet de bokeh sur l'Atomium (voir mon post sur Bruxelles) ainsi que d'autre photos que je n'ai pas encore partagées ou postées.

Malgré l'effet multiplicateur de mon boitier (un EOS 550D soit 1,6) qui fait que l'objectif correspond a un 112-320 en 24x36, et ne simplifie pas certaine prise de vue, j'aime beaucoup travailler avec celui-ci. La mise au point est précise et rapide grâce à sa motorisation USM et la stabilisation fait très bien son travail pour moi qui ai un peu la fâcheuse habitude d'avoir les mains un poil tremblante.

C'est donc un zoom que je conseille fortement. Si vous le trouvez d'occasion il ne faut pas hésiter après les vérifications d'usage, bien entendu.


Jeremie BL

mercredi 15 février 2012

Brussels / Bruxelles

Hi all,

This week, I present you photos that had been taken when I was in Brussels for a professional training. This one was done near Brussel Expo exhibition center and Heysel.

I went to brussels, 4 and half years ago, but it was as a tourist and we had anly visit the city center, the Grand-place and the European area. I didn't knew the Heysel area and it was time to see the famous Atomium.

No luck, during the all week I had my training, the weather was very cloudy, without rain for the daytime but for the evening, the only moment when I could get out, it was raining. Thus I had to do with it.

And the only not rainy evening, to make matters worse, the king Baudoin stadium floodlights were completely lit. It was quiet hard to get something correct. Here is an exemple : The Atomium.

Bonjour à tous,

Cette semaine, je vous présente une photo qui a été réalisée alors que j'étais en voyages à Bruxelles pour une formation professionnelle. Cette dernière ce faisait du coté du parc des expositions proche de Heysel.

J'étais déjà allé Bruxelles, il y a 4 ans et demi, mais c'était en tant que touriste et nous avions fait à l'époque que le centre-ville, la Grand-place, le quartier européen. Je ne connaissais donc pas du tout le coin de Heysel et c'était l’occasion de voir le fameux Atomium.

Pas de chance, durant toute la semaine qu'a duré ma formation, le temps a été très couvert, sans pluie pendant la journée mais le soir, seul moment ou je pouvais sortir, il pleuvait. J'ai donc dû composer avec.

Et le seul soir ou il n'a pas plu, pour ne rien arranger, les projecteurs du stade du roi Baudoin étaient complètement allumé. Ce fut relativement difficile d'avoir quelque chose de correct. En voici un exemple : L'Atomium.


iso 1600 - 18mm - f/3.5 at 1/40sec.
© www.atomium.be - SABAM 2012 - Jeremie BL

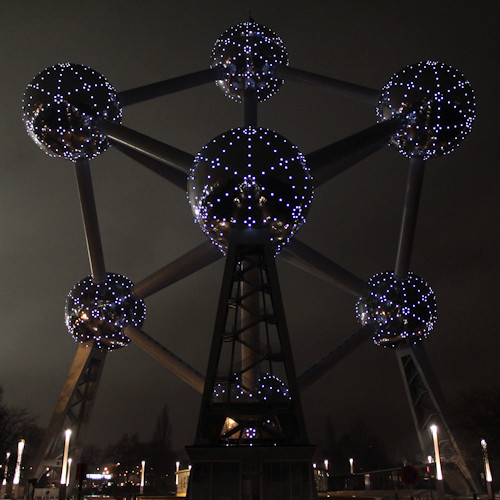
But this is not the particular picture that I want to show. The next photo is most a test of mine about blur and light effect, picture that I apprieciate a lot. You have certainly notice the blue light all around spheres of atomium sutructure. This point had caught my attention and the disposition of those lights gave me the possibility to create a graphical effect on it.

I used for this one my 70-200mm at is minimal focal length and at its widest aperture (f/4) making the focus before one of the spheres. Being in aperture priority, the speed was set automaticaly due to the aperture. Notice the perfect circles of light made this way and the graphic layout that provides.
Mais celle-ci n'est pas la photo que je voulais spécialement vous monter. La photo suivante est plus un de mes tests sur le flou et les effets de lumière, photo que j'apprécie beaucoup. Vous avez certainement remarqué les spots bleu tout autour des sphères de la structure de l'atomium. Ce détail m'a interpellé et la disposition de ces lumières, donnée la possibilité de créer un effet graphique.

J'ai pour celle-ci utilisé mon 70-200mm à sa longueur de focale minimale et à pleine ouverture (f/4) en faisant le point en avant d'une des sphères. Étant en priorité ouverture, la vitesse c'est calée toute seule par rapport à l'ouverture. Remarquez les cercles parfait de lumières réalisés de cette façon et l'agencement graphique que cela procure.


iso 1600 - 70mm - f/4 at 1/15sec.
© www.atomium.be - SABAM 2012 - Jeremie BL


Jeremie BL

jeudi 9 février 2012

Street art / Art de rue

Hi all,

For my second exhibition, that will be in Epinay (Essonne, France), our club had to choose a theme from a list. This time, the theme is specific to each participating photo club, and by democratic vote, we choosed "Street Art". This is a quiet interesting subject that allow to realize a lot of different pictures. However autumn and winter seasons are not, I thought, specialy good time for this theme, anyway in this hemisphere if we have not already take pictures that match the subject.


As I have no photos for this theme, I decided to search how to approach it and what kind of pictures I wanted to submit. Given the season I turned quickly to graffiti.
Thus, I researched where I can found great graffiti to take into pictures. Attention, it was not enough to take graffiti and print it like this for the exhibition, my role as hobbyist photographer was to stage it.


Following my research, I saw some graffiti around the city of Massy, especially two murals just next the RER C and the Ampère street, but I had trouble figuring out how to develop them without just taking a picture of it.


So I tried to found other paintings, searching from the association that had paint those two I saw. I don't remember how I found this third location via Internet but my surprise was great when I went there and glimpse the place. It is a tunnel, with two separated ways that was certainly planned for a road, but now it is pedestrian and get under the A10 french highway between Palaiseau and Villebon-sur-Yvette (Rue des chênes).


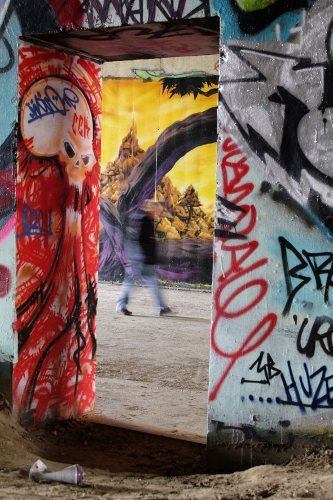
The all walls in the tunnel were covered with beautiful graffiti and an opening in the separating wall allowed me to play with perspectives and on the staging.

Bonjour à tous,

Pour ma deuxième expo, qui se déroulera à Epinay (Essonne, France), notre club a du choisir un thème parmi une liste. En effet cette fois-ci, le thème est spécifique à chaque club participant, et par vote démocratique, nous avions choisit "Art de rue".
Cet un sujet très intéressant et permettant de réaliser plein de photos différentes. cependant les saisons d'automne et d'hivers ne sont pas, je trouve, spécialement propice à ce thème, en tout cas dans cet hémisphère si l'on a pas déjà quelques photos qui correspondent au sujet voulu.

N'ayant pas de photos pour ce thème, j'avais décidé de chercher comment l'aborder et quel type de photo je voulais soumettre. Au vu de la saison je me suis rapidement tourné vers les graffs.
je me suis donc mis à chercher où je pouvais trouver des graffs sympa à prendre en photo. Attention, il ne suffisait pas les prendre tel que et d'imprimer la photo pour l'expo, mon rôle comme photographe amateur était de mettre en scène ce dernier.

Suite à ma petite recherche, j'avais aperçu un certain nombre de graff dans les environs de Massy, notamment deux fresques à coté des voies de RER C et de la rue Ampère, mais j'avais du mal à trouver comment les mettre en valeur sans les prendre simplement en photo.

J'ai donc essayé de trouver d'autres fresques, en recherchant à partir de l'association ayant réalisé les deux que j'avais repérées. Je ne me souviens plus de comment j'ai réussi à trouver via le net ce troisième site mais mon étonnement fut grand quand j’aperçus l'endroit. Il s'agit d'un tunnel, à deux voies séparées qui devait certainement être prévu à l'origine pour le passage d'une route, mais maintenant piétonnier et passant sous l'autoroute A10 à la limite de Palaiseau et Villebon sur Yvette (rue des chênes).

L’ensemble des murs de ce tunnel était recouvert de graff magnifique et une ouverture dans le mur de séparation des voies m'a permis de jouer sur les perspectives et la mise en scène.

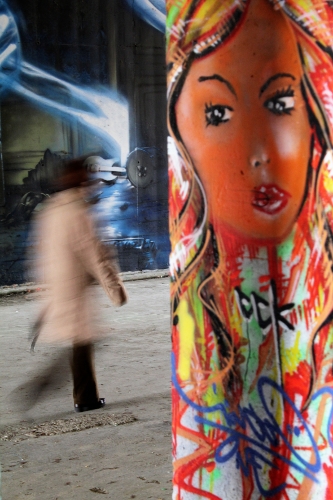
iso 800 - 36mm - f/5.6 at 1/6 sec.

iso 800 - 55mm - f/5.6 at 1/6 sec.

Both pictures have to be taken on two days, few months, 3 to be exact, after my first sighting. First of all because taken during January, the weather was not sunny enough and the low temperatures did not help stay without shivering, and having forgotten my tripod, first tries, given the focal and the speed used, was blurred.

Thus I returned few days later when weather conditions were better and with my tripod. The advantage was that my first visit there had helped me to define what was the good settings to get people walking blurred just enough and a correct field of depth.

I had just to put my tripod in place and wait to get the right passer-by through the tunnel. And here is the result.
Les deux photos ont du être prises sur deux jours, quelques mois, 3 pour être exact, après mon premier repérage. Tout d'abord parce que prisent au mois de janvier, la météo n'était pas de la partie et les basse températures n'aident pas pour rester sans trembler, et ayant oublié mon trépied, les premiers essais étaient, au vu de la focale et la vitesse utilisé, un peu flou.

Du coup j'y suis retourné quelques jours plus tard quand les conditions météo étaient de retour et avec mon trépied. L'avantage c'est que mon premier passage m'avais permis de déterminé quels étaient les bon réglages pour avoir le passant flou juste ce qu'il faut quand il marche et une profondeur de champ correcte.

J'avais juste à poser mon trépied au bon endroit et s'en suivi ensuite l'attente d'avoir le bon passants. Et voilà le résultat.


Jeremie BL